Description
Overview
Essential details:DS200SSBAG1BAA GE DC300 Drive Snubber Board
DS200SSBAG1BAA Technical Specifications
| Manufacturer | GE General Electric |
| Series | Mark V |
| Part Number | DS200SSBAG1BAA |
| Product Type | Snubber Board |
Product Description
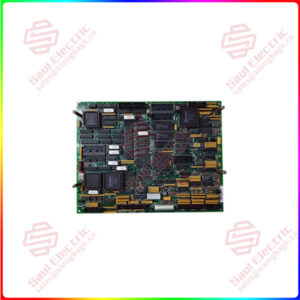
The GE DC300 Drive Snubber Board DS200SSBAG1BAA features one 2-pin connector, 3 capacitors, and four posts for attaching cables. The capacitors are identified as MOV1, MOV2, and MOV3. The identifiers are printed on the board next to the capacitors. Because there are multiple cables connected to the board that have to be disconnected and then reconnected to the replacement board, there are several guidelines to follow to avoid errors during the replacement process that might cause the servicer to attach the cables to the wrong terminals.

DS200SSBAG1BAA
lf you need to inquire or purchase ,please send the product models to my email or call medirectly .
sunny He
[Email] sales@xiongbagk.cn
[Mobile] 86-18059884797
[WhatsApp] 86-18059884797
[Skype] sales@saulcontrol.com
DS200SSBAG1BAA GE DC300 Drive Snubber Board
-
Before you remove the defective board from the drive, examine the cables attached to the terminals and note the IDs assigned to the terminals. Write on a tag or sticker the ID of the connector to which each cable is attached and attach it to the cable. There is also a 2-pin connector on the board. However, since there is only one 2-pin connector you can disconnect it without attaching a tag or sticker to it.
Make sure to find an angle that provides you with a good view of the board cabinet so that you can remove the board without damaging other boards or components in the drive. Carefully insert the screwdriver into one of the screws and loosen the screws. It might be helpful to use one hand to guide the screwdriver to the screw. Hold the screw with one hand when you remove it and keep all the screws and washers together and ready to be used when you install the replacement.
Frequently Asked Questions about DS200SSBAG1BAA
How many capacitors are located on DS200SSBAG1BAA?
You will find 3 capacitors on DS200SSBAG1BAA. DS200SSBAG1BAA’s capacitors are labeled MOV1-MOV3.What is the voltage of DS200SSBAG1BAA’s batteries?
Each of the batteries on DS200SSBAG1BAA are 660 VAC. There are two batteries on DS200SSBAG1BAA and both of these batteries for DS200SSBAG1BAA are AZ CAP K90017-437 batteries.How many wires are connected to DS200SSBAG1BAA?
There are four wires connected to DS200SSBAG1BAA by two connection points, T1-1 and T1-2, on DS200SSBAG1BAA.


 1 Year Warranty
